

[ad_1]
Chrome is vastly used worldwide to browse the Internet for various purposes. A widely used browser like Chrome is not flawless. At times, one might encounter a few errors. Though they are annoying, the majority of them can be resolved at your easement. One such annoying error is the err_ssl_version_interference error. This can be caused because of different reasons. This article revolves around the introduction, causes and solutions of the same.
What is ERR_SSL_VERSION_INTERFERENCE Error in Google Chrome?
The term ‘SSL’ is an abbreviation for ‘Secure Sockets Layer’. An SSL is majorly used to transmit data through TCP sockets. The algorithm of Google Chrome uses the same to connect to various websites. These websites include YouTube, Amazon, Facebook, Google, etc. Thus, when you encounter the err_ssl_version_interference error in Android, iOS or Windows Computer, it is because Chrome has failed to load a website.
Users from across the globe have been encountering the error from a long time now. When you see it, remember that this is because Chrome failed to determine the SSL version of a website. Not just that, the possibility is that the device used to browse the website has SSL version conflict. Also, you can face this error in any of the device, let it be Windows PC or Android Phone or iOS Phone. You can try out the solutions below to even fix this error in Android or iOS Mobile phone, and not only in Computers or Laptops.
A more precise explanation of the causes is mentioned in the next section.
Causes of ERR SSL VERSION INTERFERENCE Error
Some experts state that there can be loads of reasons for this error. Yet only a few of them are considered to be true. Few of the true ones are mentioned below:
- Cache: The temporary data stored by the web browser while loading websites might be causing conflict with SSL settings.
- Anti-Virus: Third-party anti-viruses have a tendency of modifying your web browsing experience to make it better. This sometimes causes interference with the SSL settings.
- TLS 1.3: TLS, here, is used as an abbreviation for Transport Layer Security. This feature has been found to interfere with the SSL on Google Chrome.
- Corrupt Installation Files: When you try to install an extension or something else, there might be some corrupt installation files. If you encounter incomplete installation, this could be a reason behind err_ssl_version_interference error.
Now that you are well aware of the causes of the error, let us dive into the main section. I’ll you with fruitful aids to solve the problem.
How to Fix ERR_SSL_VERSION_INTERFERENCE Error in Google Chrome?
If you have encountered this error then the cause of this error for you might be not same for any other person. There might be various reasons of the error occurance. Here, we have compiled the simplest and most effective of them all. Do try them and if you require any further help, comment down below without hesitation.
NOTE: The given solutions can be tried in any of the device on which you are facing this error. If you are facing the error in Android, then try out the solutions that can be followed for Android. The steps for Android or Windows remains almost same so you can predict the steps and try them out.
Before we proceed to the list of solutions available, please make sure that you:
- Log in to the Administrator account of your system.
- Have a private internet connection.
- Don’t use any public WiFi networks.
As soon as you are sure with the points mentioned above, proceed with the solutions mentioned below.
Solution #1 – Clear the Browsing Data
The first cause that I’ve mentioned was due to junk files stored by the browser. Follow the process step by step mentioned below to clear browsing data:
- Log in to your PC and launch Google Chrome application.
- Press Ctrl+H to open browsing history of the browser in a new tab.
- Locate the ‘Clear Browsing History’ option from the left corner of the window.
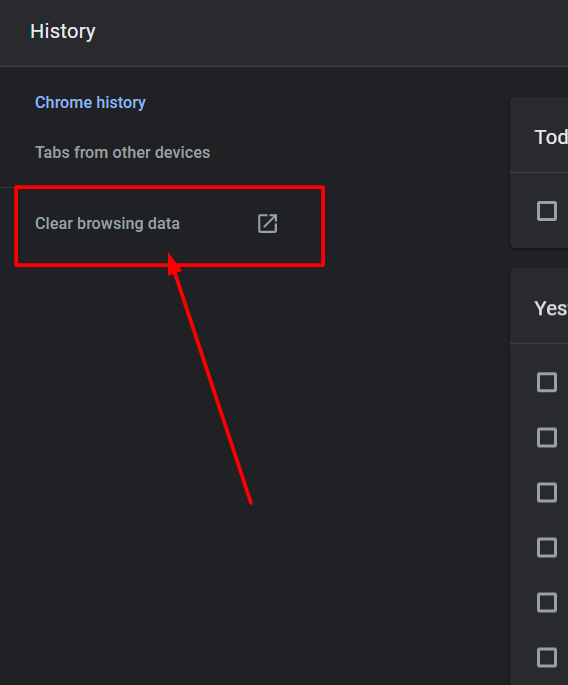
- Click on the same and a new window will pop-up.
- Make sure you select ‘Advanced’ from the top.
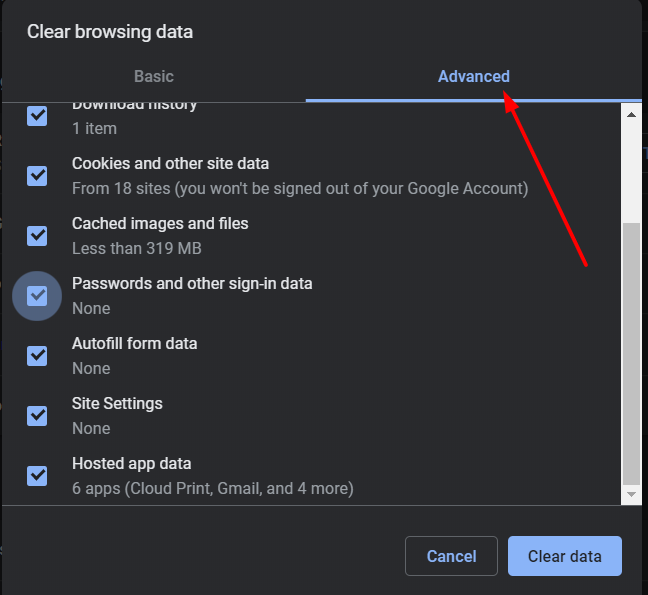
- Now, check all the boxes as shown below:

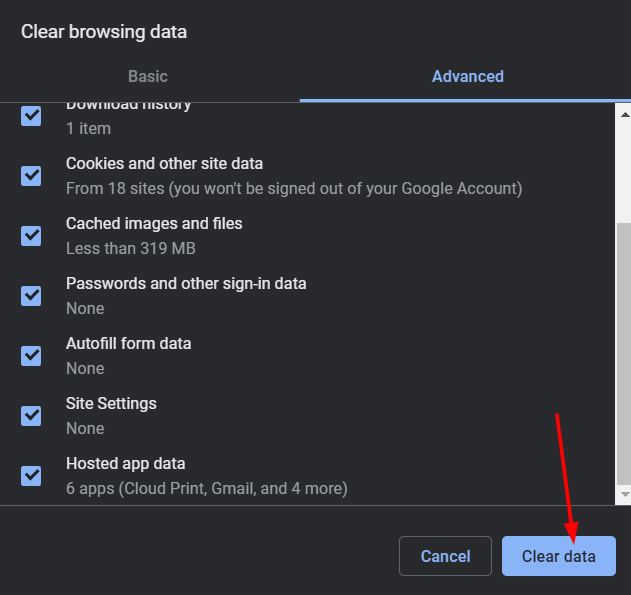
- Once done, click on ‘Clear Data’ and proceed.
- Now, relaunch the Google Chrome application to check if the issue has been resolved.
In case, the error continues to pop-up on the screen, try the other methods available below.
ALSO SEE – How to Quickly Fix “ERR INTERNET DISCONNECTED” Error in Google Chrome?
Solution #2 – Disable Anti-Virus
I’ve mentioned above that the third-party anti-viruses have a tendency of causing conflicts. Therefore, you might need to disable the same to cure the problem. We can’t mention the step-by-step process to do so as every application will have a different process. Thus, you’ll have to do this on your own.
Though, if you are using Windows default firewall then here are the steps to disable Windows Defender temporarily.
Once done, relaunch the Chrome application and look for the problem. If you find nothing, voila! In case, the problem still persists, try uninstalling the anti-virus. A few anti-virus look for threats without any prior notice. If you have one such application, the problem will continue. Thus, try uninstalling the anti-virus or you can also look for the latest version of that antivirus.
CHECK OUT – List of Best Free Antivirus with Download Links
In case, you don’t wish to proceed with this process, give a try to other solutions mentioned below.
Solution #3 – Disable TLS 1.3
Another method to cure the problem is by disabling TLS 1.3. The step-by-step process to do the same is here:
- Log in to your computer and launch the Google Chrome application.
- In the address bar, type the following: chrome://flags/#tls13-variant
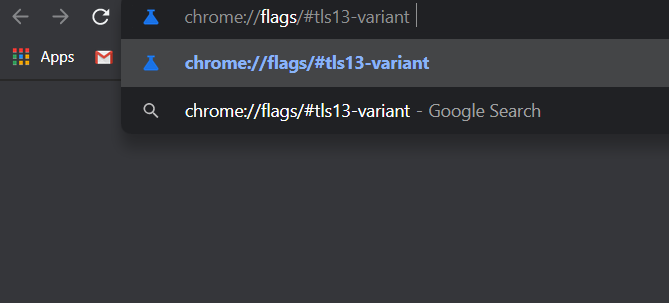
- Then press ‘Enter’ key and wait for a couple of seconds. This will take you to the experimental features page of Chrome.
- Here, locate TLS 1.3 and navigate to the drop-down options available besides the same.
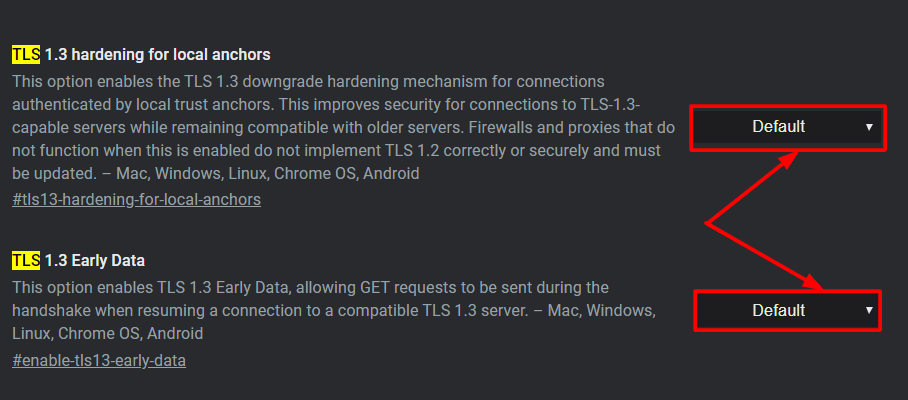
- From here, disable the TLS 1.3 and you are done.
- Now, relaunch the Chrome application to see if the problem continues.
For any reasons, if you are required to enable the TLS 1.3 then you can reset the Chrome Settings to the Default or you can follow the above steps back and enable TLS 1.3 back.
Solution #4 – Clear DNS Cache
Chrome struggles to reach the website servers if a system has a DNS Cache which can interfere or confuse the background process-flow. Therefore, clear it and you will be good to go. Follow the step-by-step process mentioned below for the same:
- Log in to your computer and press Windows + S key to launch the search box.
- Here, type ‘command prompt’ without the quotation marks.
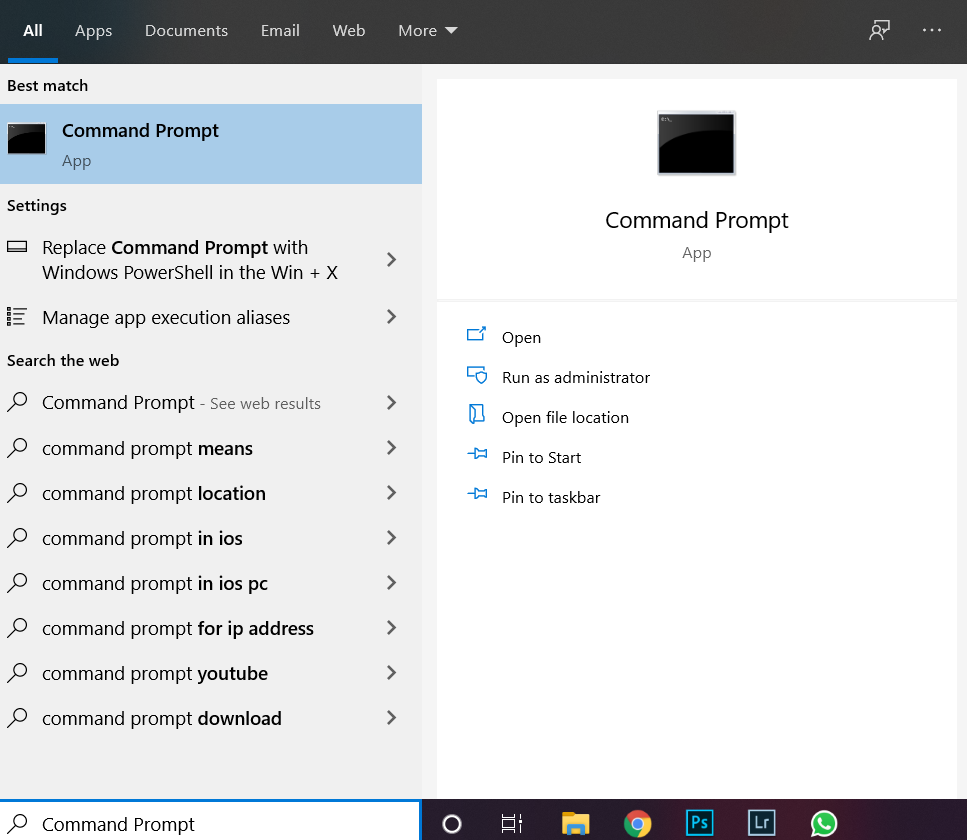
- You will see some search results. Now, look for the option of ‘Run as Administrator’ and click on the same.
- Once done, type the following code:
ipconfig/flushdns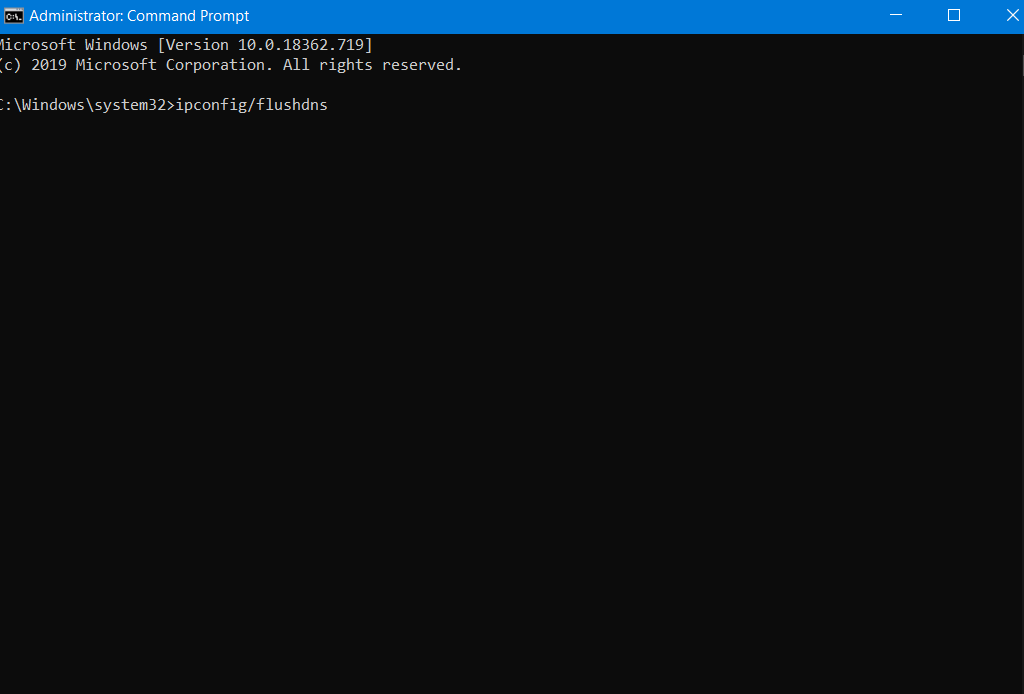
- As soon as Windows is finished with the process, look for the following message:
Windows IP Configuration. Successfully flushed the DNS Resolver Cache.
That’s it. Restart Google Chrome and see if everything is back normal.
YOU MAY ALSO LIKE – Tricks to Get Netflix Free Trial without Credit Card
Solution #5 – Reset Chrome
Another solution that you can try is resetting the Chrome settings. To do so, you will have to make sure that the ‘Reset Profile Settings’ feature is enabled. To enable the same, follow these steps:
- Launch the Chrome application and type ‘chrome://flags’ in the address bar without the quotation marks. Then, press the ‘Enter’ key.
- Locate the ‘Enable Reset Profile Settings’ option and click on ‘Enable’.
As soon as you are done with this, proceed to the actual process in the steps mentioned below:
- Close and relaunch the Chrome application.
- Now type ‘chrome://settings’ in the address bar without quotation marks. Then, press the ‘Enter’ key.
- Locate the ‘Advanced’ settings option and click on the same.
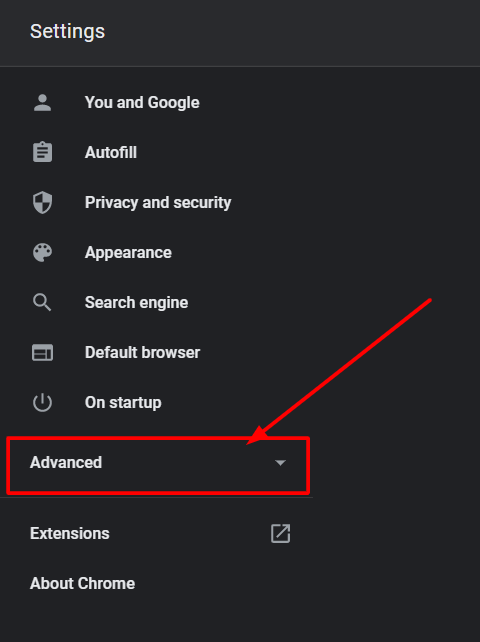
- At the bottom, you will see ‘Reset and Clean Up’. Click on it.
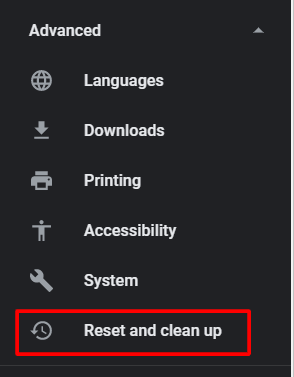
- Now, reset all the settings to their original default and again click on ‘Reset Settings’.
- Once done, relaunch the browser to check if the problems continue.
In case, the problem is yet not resolved, try the last available method.
Solution #6 – Update Chrome Application
Go to Google and look for the latest version of Google Chrome. I’m attaching a link to the latest version below. Click on the same and download the latest version of Chrome application for your Windows PC or Android, iOS Device.
Download Latest Version of Google Chrome
Other Google Chrome Errors with Solutions:
Wrapping up…
The err_ssl_version_interference android error is pretty common when you use Google Chrome on Computer or Mobile Device. Fortunately, we have explored all the possible solutions to this error for both Android or iOS Phone and Windows PC. In case we have missed any solution to the same, comment down below. We will try to include the same in our article. Also, if you are facing any issues or dificulty in following the given solutions, pleas feel free to comment and we will be there for your instant help. Thank you!
[ad_2]