
[ad_1]
Can’t connect to the internet after applying the latest windows 10 update? Having Network and internet connection issues or network adapters stopped working after applying windows update? You are on the right post to get solved Windows 10 Internet connection problems.
Microsoft regularly releases new windows updates for Windows 10 to improve the performance and patch security vulnerabilities, But a number of windows users report the intermittent loss or slow connection speeds of Wi-Fi connectivity, or complete loss of connectivity that prevents accessing the web. And the common reason for this problem (No internet access) is the network adapter driver, either its outdated, corrupted, not compatible with the current windows version. Again the physical connection, incorrect network configuration, VPN, proxy or firewall may also block accessing the internet. whatever the reason, here solutions apply to get back online again.
Windows 10 No internet access
Start with basic troubleshooting:
- Check the physical connections before getting too involved with troubleshooting. May someone accidentally kicked the router or modem’s power cable or pulled an Ethernet cable out of a socket, that causing the problem.
- Restart all network devices, router, modem, switch include your PC, that fixes the problem if temporary glitch causing the issue.
- If you are using a laptop and having a problem connect wifi network, make sure that the physical Wi-Fi button on your laptop is turned on.
- Check the Region, date & Time settings are correct according to your timezone.
- Check your Antivirus firewall that may block internet access, Again disconnect from VPN (if configured on your PC)
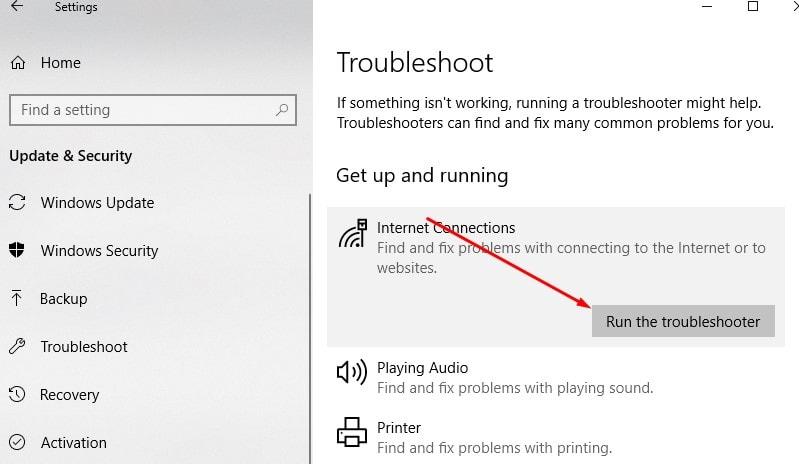
Run the Internet troubleshooter
Run the build in internet troubleshooter that automatically detect and correct network configuration settings that may prevent internet access. Again run the troubleshooter for Network adapter that checks for errors, driver issues and help windows 10 pc get back online again.
- From start menu search for and select troubleshoot settings,
- The troubleshoot window opens scroll down and locate Internet connections, select it,
- Now click run the troubleshooter to start the diagnose process,
- This will automatically detect and fix problems with connecting to the internet or web pages

- Once the troubleshoot completes locate network adapter, select it,
- Then click Run the troubleshooter that helps fix problems with wireless and other network adapters.
- After complete the diagnose process restart your PC and check if windows allow visit web pages.
Check network configuration
The next step you should check your computer has a valid IP address, If your computer’s IP settings aren’t correct, it can cause this “no internet access” or “Wi-Fi doesn’t have a valid IP configuration” error.
- Press Windows + R, type ncpa.cpl and click ok,
- This will open network connections window,
- Right click on the active network adapter, select properties,
- Find Internet Protocol Version 4 in the list and double-click that.
- Here, make sure you have Obtain an IP address automatically and Obtain DNS server address automatically both selected.

Switch to Google DNS
Domain Name Servers (DNS) play an important role in accessing web pages that maintain a directory of domain names and translate them to Internet Protocol (IP) addresses. Let’s switch to Google public DNS that probably helps resolve if you having issues Connected to Ethernet or Wi-Fi, But No Internet Access in Windows 10.
- Again open network connection using ncpa.cpl
- Go to properties of the active network adapter,
- Double click on Internet Protocol Version 4,
- Here select the radio button Use the following DNS server address then set preferred DNS server 8.8.8.8 and Alternate DNS server 8.8.4.4
- Check mark on validate settings upon exit and click ok.
- Now open web browser and visit any web pages.

Run Network Troubleshooting Commands
Still need help, Let’s reset TCP/IP configuration following steps below. In this method, you will need to run certain Network Troubleshooting Commands to Reset the TCP/IP Stack, Release IP address, Renew IP address and to Flush and Reset the DNS client resolver cache.
Open the command prompt as administrator and perform following commands one by one.
- netsh winsock reset
- netsh int ip reset
- ipconfig /release
- ipconfig /renew
- ipconfig /flushdns
Once done restart your PC to take effect the changes, Now open any web pages and see if the problem solved or not.
Update driver for the network adapter
Again the network connectivity problem on your computer could be due to an outdated Network Adapter Driver, especially if you have recently upgraded to Windows 10 and also if your computer has not installed an update for the Driver.
In order to update the Driver, you will need another computer with a working internet connection. Visit the website of your Network Adapter manufacturer, download the latest drivers to a USB drive and follow the steps below.
- Right Click on Windows 10 Start button and click on Device Manager from the menu that pops up.
- On the device Manger Screen, click on Network Adapters to expand the entry. This will list all the network adapters that were installed on your computer.
- From the expanded list, right click on the Network Adapter for your computer and click on Update Driver Software
- Next, follow the instructions to install the updated driver that you had downloaded to the USB drive.
- After installing the updated driver, Restart the computer and see if the network connectivity problem on your computer has been fixed.
Roll Back Network Adapter Driver
This solution can help in case you were able to connect to the internet and the problem has only started recently after you updated the Network Adapter Driver.
- Right Click on Windows 10 Start button and click on Device Manager from the menu that pops up.
- On the Device Manager screen, click on Network Adapters to expand the entry
From the expanded list, - Right click on the Network Adapter for your computer and click on Properties
- In the Properties screen, click on the Driver tab and select Roll Back Driver.
- If the Roll Back Driver button is unavailable, it means that there is no Driver available to roll back to.
- After rolling back to the previous version of the driver, restart your computer for the changes to take effect.

Uninstall Network Adapter Driver
In case you are unable to fix the problem after trying to update the Driver, uninstalling the Driver and allowing your Windows 10 Computer to automatically reinstall back a New Driver might help in fixing the network connectivity problem on your computer.
Before uninstalling the Driver it is recommended that you create a Manual Restore Point on your computer so that you can restore your computer using the restore point in case Windows 10 is unable to reinstall a new Driver and the existing driver gets deleted.
- Right Click on Windows 10 Start button and click on Device Manager from the menu that pops up.
- On the device Manger Screen, click on Network Adapters to expand the entry. This will list all the network adapters that were installed on your computer.
- From the expanded list, right click on the Network Adapter for your computer and click on Uninstall
- You will see a popup warning saying “You are about to uninstall this device from your computer”, click on OK to Uninstall.
- Restart your computer, Windows should automatically reinstall the right Driver for the Network Adapter.
As mentioned above, in case of a problem you can easily undo the changes on your computer and get back to where you were by restoring your Computer using a Manual System Restore Point that you had created before going ahead with these steps.
Use network reset to reinstall network devices
Well, you’ve proceeded through all these steps and still have an Internet connection problems, there’s not much you can do other than reset your network settings. It removes any network adapters you have installed and the settings for them. After your PC restarts, any network adapters are reinstalled, and the settings for them are set to the defaults.
- Open settings using keyboard shortcut Windows + I
- Click on Network & Internet then Status,
- Now on right-hand side scroll down and click on network reset link

- A new window opens with an option to reset network reset, click reset now button,
- Again click yes when asking for confirmation,
- Wait for your PC to restart and see if that fixes the problem.

Did these solutions help resolve windows 10 internet connection issues? Let us know on comments below.
Also read:
[ad_2]